How to Set Up Hygienic Zoning in Your Food Manufacturing Facility
If your facility is working towards FSSC 22000 certification or strengthening its Environmental Monitoring Program (EMP), you have likely come across the term hygienic zoning. This guide explains what Zones 1 to 4 are, how to assign them in your facility, and how they determine where and what you test in your EMP.
What Is Hygienic Zoning in Food Manufacturing?
Hygienic zoning is the practice of dividing a food manufacturing facility into areas based on their contamination risk to the finished product. The goal is to control the movement of people, equipment, and materials so that pathogens and other hazards do not travel from low-risk areas into high-risk ones.
It is a foundational Prerequisite Programme (PRP) recognised by GFSI-benchmarked schemes including FSSC 22000. Under FSSC 22000 Clause 2.5.7, facilities must implement an Environmental Monitoring Program, and hygienic zoning is what gives that program its structure: it tells you where to sample, how frequently, and which organisms to look for.
Hygienic zoning works alongside other food safety controls, including Allergen Management under FSSC 22000 and measures to reduce food waste caused by contamination, cross-contact, or rejected products. If you are new to the broader system, our guide to FSSC 22000 certification in Malaysia explains the full framework.
What Are Zones 1 to 4 and How Are They Defined?
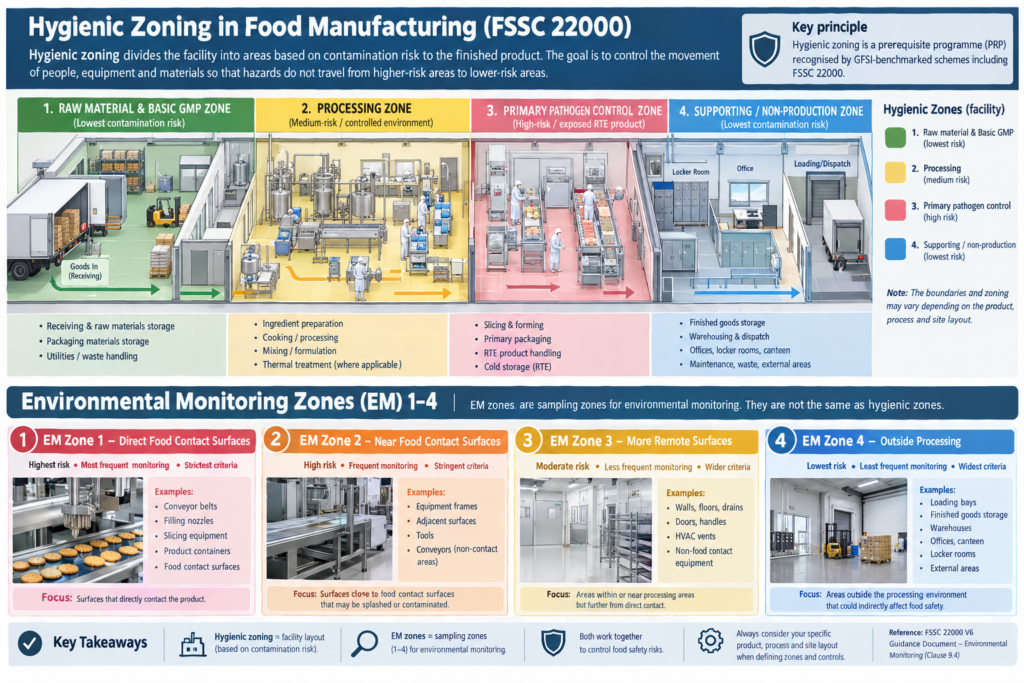
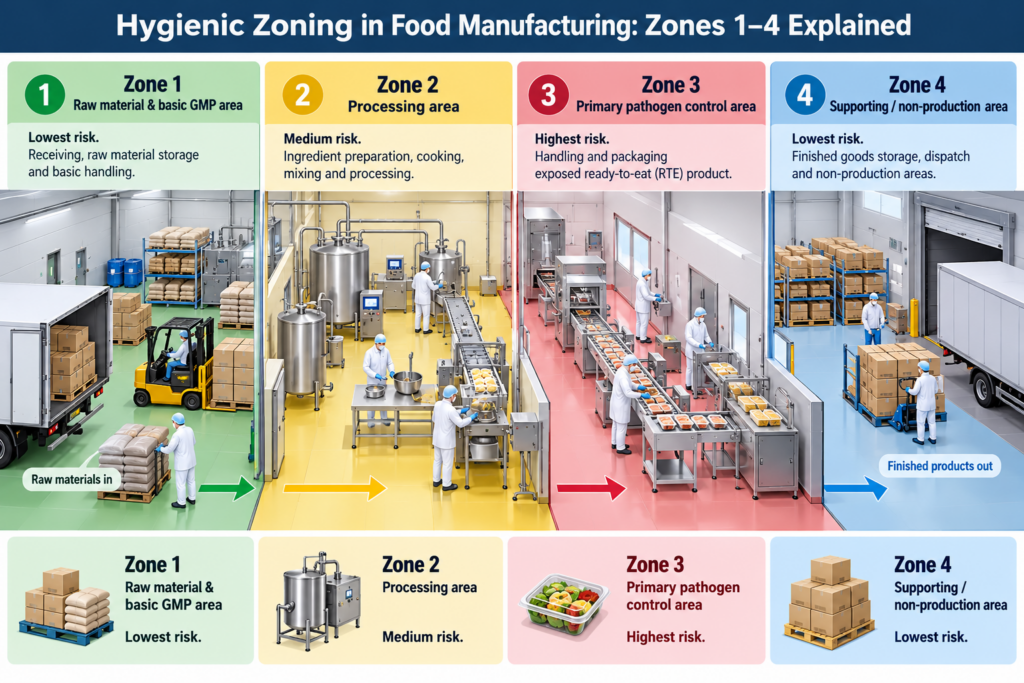
The four-zone model classifies areas by their proximity to exposed food and the risk of product contamination. Here is how each zone is typically defined:
Zone 1 covers direct food-contact surfaces after the last pathogen-reduction step. Examples include conveyor belts where product is open, filler nozzles, slicer blades, and packaging surfaces that touch the food. This is the highest-risk zone because any contamination here reaches the product directly. Zone 1 requires the most intensive sampling and targets specific pathogens such as Listeria monocytogenes for ready-to-eat or chilled products, and Salmonella spp. for low-moisture environments. For facilities producing ready-to-eat or chilled products, Listeria environmental monitoring is particularly important for detecting contamination on product-contact surfaces before it reaches the food.
Zone 2 covers surfaces and equipment near Zone 1 that do not directly touch food but are close enough to transfer contamination through splashing, condensation, or personnel movement. Examples include the frames of filling equipment, the outer surfaces of hoppers, and equipment legs near processing lines. Sampling in Zone 2 targets pathogens and pathogen indicators.
Zone 3 is the general production environment: floors, drains, walls, and air handling units in production rooms. Contamination in Zone 3 becomes a risk when cleaning practices or personnel hygiene fail to stop cross-transfer into Zone 2 and Zone 1. Swabbing here typically targets indicator organisms such as Enterobacteriaceae and general aerobic plate count rather than specific pathogens.
Zone 4 covers non-production areas such as raw material receiving, storage, locker rooms, and corridors. The risk of direct contamination is low, but Zone 4 is where harborage niches and incoming contamination often originate. Sampling is least frequent but still important for trend monitoring.
How Do You Map Hygienic Zones Across Your Facility?
Zone mapping starts with a floor plan and a cross-functional team that includes production, quality, and maintenance. Walk the facility and identify every surface and space, then assign a zone based on two criteria: proximity to exposed food and the cleaning and sanitation level applied to that area.
In our work with Malaysian food manufacturers, the most common mistake is assigning zones based on where a room sits on the floor plan rather than on actual product exposure and flow. A room labelled “packaging hall” is not automatically Zone 1 if the product is sealed before entering it. Conversely, a drain in the middle of an open-processing area is at minimum Zone 3 and can influence Zone 2 sampling points during root cause investigations.
Key principles for zone mapping include the following. Physical barriers such as positive air pressure, footbaths, and changing rooms define the transitions between zones. People and equipment should flow from high-risk to low-risk zones, never in the reverse direction. Drains should be assigned the zone of the highest-risk area they serve. Overhead structures, condensate drip zones, and return air ducts should be factored in, not just floor-level surfaces.
Your zone map must be reviewed whenever the facility layout changes, a new product line starts, or a positive environmental result triggers a root cause investigation. See our article on what an Environmental Monitoring Program requires under FSSC 22000 for the review triggers under Clause 2.5.7.
How Does Hygienic Zoning Determine Your Sampling Plan?
Your zone assignments directly control three variables in your EMP: sampling site selection, sampling frequency, and target organisms.
Sampling site selection follows the zone hierarchy. Zone 1 sites are chosen at the points of greatest product exposure immediately after the last sanitation event. Zone 2 sites surround Zone 1 and cover common transfer routes. Zone 3 sites are placed at drains, floor junctions, and air return points. Zone 4 sites are selected at receiving doors, personnel entry points, and raw material storage areas.
Sampling frequency is highest in Zone 1 and decreases outward. A typical starting framework might set Zone 1 at weekly sampling, Zone 2 at monthly, Zone 3 at quarterly, and Zone 4 at semi-annual. However, your actual frequency should be set by risk assessment based on product type, historical results, and the presence of ready-to-eat products in your range.
Target organisms are product- and process-specific. For ready-to-eat and chilled products, Listeria monocytogenes and Listeria spp. (as a wider indicator) are the primary Zone 1 and Zone 2 targets. For low-moisture products such as biscuits, cereal, or powders, Salmonella spp. is the key pathogen. For fresh produce, E. coli and generic coliforms are added alongside Listeria. Indicator organisms such as Enterobacteriaceae and aerobic plate count are used in Zones 2 to 4 to monitor overall sanitation effectiveness without the cost of pathogen testing at every point.
If your facility handles multiple product categories, a risk-based approach aligned with your HACCP study will help you prioritise zone assignments and sampling targets correctly.
What Happens When an Environmental Sample Tests Positive?
A positive result in Zone 3 or Zone 4 triggers intensified sampling in that zone and in adjacent higher-risk zones. It is an early warning and does not automatically mean the product is contaminated. A positive result in Zone 2 requires immediate intensified sampling across the entire EMP, a review of sanitation procedures, and corrective action documentation. A positive result in Zone 1 is a critical event: product hold, root cause investigation, and corrective action are required before production resumes.
The corrective action protocol should be documented in your EMP before you start sampling, not drafted after a positive result. Your protocol should specify who is notified, how quickly, what product is held, and what the re-sampling schedule looks like to confirm the harborage has been eliminated.
Facilities working towards or maintaining ISO 22000 certification will find that hygienic zoning and EMP corrective action records are frequently reviewed during external audits.
Hygienic zoning is not a one-time exercise. As your facility evolves, your zone map must keep pace. Getting the zone assignments right from the start means your EMP samples from the right places and gives you data that actually reflects your contamination risk.
If your facility is preparing for FSSC 22000 certification or reviewing your current EMP under Version 7, contact Connext to discuss a gap assessment and zone mapping review.
Frequently Asked Questions
Is hygienic zoning a mandatory requirement under FSSC 22000?
Hygienic zoning is not listed as a standalone mandatory clause but it is the expected method for fulfilling FSSC 22000 Clause 2.5.7 on Environmental Monitoring. Auditors will look for a documented zone map and sampling rationale based on zone risk levels.
How many zones must my facility have?
The four-zone model (Zones 1 to 4) is the industry standard, but your facility may not have all four zones if, for example, no food-contact surfaces are exposed post-process. The number of zones is determined by your process flow and product risk, not by a fixed rule.
Can one room contain multiple zones?
Yes. A single room can contain Zones 1, 2, and 3 simultaneously. For example, an open-processing room may have Zone 1 at the filling equipment, Zone 2 at the surrounding conveyor frame, and Zone 3 at the floor drains in the same space.
How often should we review our zone map?
At minimum annually, and also whenever you change your facility layout, add a new product line, install or remove equipment, or receive a positive environmental test result. FSSC 22000 Clause 2.5.7 specifies that EMP reviews must be triggered by these changes.
What is the difference between a hygiene zone and a high-risk or high-care area?
High-risk and high-care are specific designations used in BRCGS and other schemes for areas producing ready-to-eat food requiring separation and distinct personnel flows. Hygienic zones (1 to 4) are a broader framework used across all GFSI schemes. Zone 1 in your EMP often corresponds to what BRCGS would call a high-risk or high-care area, but the terminology differs by scheme.